OPERATION JUBILEE:
19 August 1942 Raid at Dieppe
Visit our web map exploring the Raid at Dieppe

Visit our web map exploring the Raid at Dieppe
Operation Jubilee was an Allied amphibious operation to raid a major port on the French coast. The objective was to take and hold the town of Dieppe. The operation saw more then 6000 soldiers land early in the morning on the 19th of August 1942. Most of the soldiers were from the 2nd Canadian Infantry Division led by Major General John Hamilton Roberts from his command ship the HMS Calpe. The main assault was supported by the 14th Canadian Army Tank Regiment (The Calgary Regiment) using Churchill tanks and Daimler scout cars. On the far flanks British Commando units also supported the operation, including No.3 and No.4 Commando, as well as a unit of the Royal Marines.
The beginning of the operation was to be kicked off by the Commando units of No.3 and No.4 Commando who would land at Yellow and Orange beach respectively. No. 3 Commando would land at Yellow Beach 13km east of Dieppe, with the objective of destroying the Goebbels coastal battery at Berneval. No. 4 Commando would land 10km to the west of Dieppe, with the objective of destroying the Hess battery at Blancmesnil.
Next to land before the main assault were the two flank attacks by the South Saskatchewan Regiment (SSR) and Queens Own Cameron Highlanders of Canada (QOCH). The SSR would land at Green Beach near Pourville west of Dieppe, and the Royal Regiment of Canada with a company of The Black Watch of Canada who would land at Blue Beach near Puys and east of Dieppe.
Last to arrive would be the main assault force landing on the beaches in front of the town of Dieppe, code named White and Red Beach. The Royal Hamilton Light Infantry would land at White Beach, while the Essex Scottish Regiment would land at Red Beach. To support the attacks, it was intended for three squadrons of tanks from The Calgary Regiment (Tank), 14th Canadian Army Tank Regiment to land at White and Red beach to support the assault.
In Reserve were Les Fusiliers Mont-Royal and Royal Marines who were not designated for a particular beach, but on call to reinforce where needed. During the battle Les Fusiliers Mont-Royal and the Royal Marines would be ordered to land at the main beach, but only the Les Fusiliers Mont-Royal would in fact land.
To support the invasion of Dieppe, the Royal Navy supplied more then 230 ships. Most of these were landing craft and support ships escorted by a mere nine destroyers. No battleships, or cruisers accompanied the force across the English Channel. To ferry over the large force, a fleet of 9 Landing Ship Infantry (LSI) carrying 60 Landing Craft Assault (LCA) were used to carry much of the infantry. The infantry and Commando units that could not be carried on LSIs were ferried over on a small flotilla of Landing Craft Personnel (LCP). Crossing the channel with the invasion fleet were 24 Landing Craft Tank (LCT) which were used to bring the tanks of the 14th Canadian Army Tank Regiment, each holding three Churchill tanks, and sometimes a fourth Daimler Scout Car.
Proceeding the main assault at White and Red Beach was a preparatory bombardment and air attack. Four destroyers lined up and began shelling the eastern and western headlands to suppress the enemy, while five Hurricane Squadrons bombed the defensive positions along the beaches and laid a defensive smoke screen for the landing. Compared to the DDay landings in 1944, the preparations for Dieppe were woefully inadequate and did little to suppress or destroy the enemy.
The following major units are mapped on the web map:
Royal Hamilton Light Infantry
The Essex Scottish Regiment
The Royal Regiment of Canada
The Black Watch of Canada
South Saskatchewan Regiment
The Queens Own Cameron Highlanders of Canada
The Calgary Regiment (Tank), 14th Canadian Army Tank Regiment
Les Fusiliers Mont-Royal
No. 3 Commando
No. 4 Commando
Royal Marines
The following units are not mapped on the web map, but fought at Dieppe and were either attachments or supporting units:
Calgary Highlanders
Toronto Scottish (M.G.)
3rd Light AA Regiment, RCA
4th Field Regiment, RCA
2nd Field Company, RCE
7th Field Company, RCE
11th Field Company, RCE
1st Field Park Company, RCE
11th Field Ambulance, RCAMC
2nd Division Ammunition Company, RCASC
2nd Provost Company
The web map is a free resource that allows the public to explore the raid at Dieppe. The web map provides the where and when for the events taking place during the battle. While much has been written about Dieppe, and how the battle takes place it can often be difficult to understand the context of how everything is connected. This project gives the public a more visual way to understand the battle that will hopefully inspire them to read the many great books and resources that dive deeper into the raid.
In just over eight hours of combat three Victoria Crosses will be awarded for gallantry during the operation, two to Canadian soldiers and one to a British soldier. Miraculously all three Victoria Cross winners would survive the war, but both Canadians would be captured and spend the next three years as Prisoners of War.
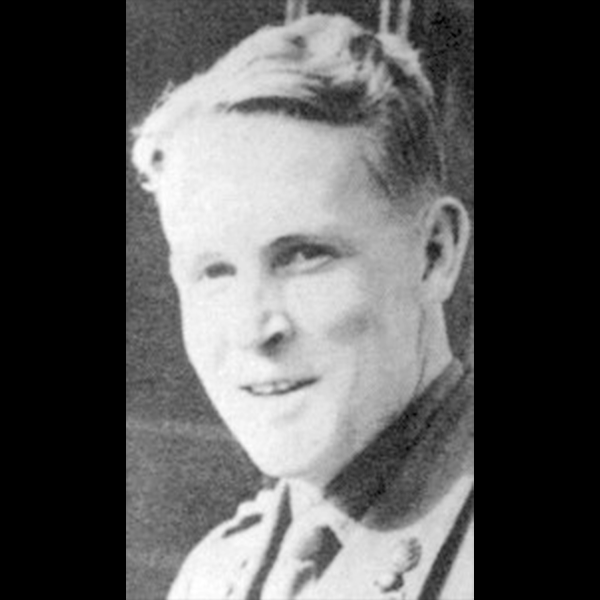
Major Porteous was attached to No. 4 Commando for the raid, and was shot through his hand during the assault, with the bullet passing into his arm.
Disregarding his wounds, he dashed across open ground while under fire and without hesitation took charge of a detachment. He then led the detachment in a bayonet charge to clear out a a German position.
Shot for a second time in the thigh, he continued to clear the final objective, finally collapsing from a loss of blood.
Lt Col Merritt was the Commanding Officer of the South Saskatchewan Regiment, and landed at Green Beach with most of his Battalion on the wrong side of La Scie River.
The only crossing was a narrow bridge covered by German fire which was piled by dead and wounded soldiers who had attempted to cross earlier.
Under heavy fire, Merritt personally led several platoons across the bridge, then attacked a concrete pillbox killing all the occupants.
Captain Foote was the Regimental Chaplain for the Royal Hamilton Light Infantry, and landed on White Beach. Over an eight hour period, Foote assisted the Regimental Aid Post with the many casualties on the beach.
Leaving the shelter of a beach depression, Foote continually ventured the beach to bring back wounded soldiers.
Foote had several opportunities to evacuate, but refused and remained with the wounded on the beach.
“The air battle over Dieppe was the single largest one-day air battle of the war.”
“Air battle over Dieppe” contributed by Dr. Mike Bechthold. mike@blackflight.ca
The RAF successfully defended the British Isles during the Battle of Britain, but the focus of air operation by the spring of 1942 had shifted to the continent. The British were eager to fight the Luftwaffe in the skies over occupied Europe, but the Germans quickly realized that they did not have to counter the British as the single seat fighters could do little damage. The RAF supported the plan for Dieppe as a catalyst to draw the Luftwaffe into battle.
In total, the following squadrons took part in the fighting:
Supermarine Spitfire – 48 Squadrons
28 RAF/6 RCAF/5 Polish/3 US/2 Czech/2 Norwegian/1 Free French/1 Belgian
Hawker Hurricane (army support) – 8 Squadrons
Douglas Boston – 6 Squadrons
5 RAF (Bomber Command) and 1 RCAF squadrons
North American Mustang (photo reconnaissance) – 4 Squadrons
2 RAF / 2 RCAF
Hawker Typhoon – 3 Squadrons
Bristol Blenheim – 2 Squadrons
Bristol Beaufighter – 1 Squadron
B-17 Flying Fortress (USAAF) - 4 Squadrons
Spitfire (USAAF) - 2 Squadrons
The RAF and RCAF squadrons performed many roles during the battle. The four Mustang squadrons surveyed the battlefield to anticipate the arrival of German reserves. The medium bombers (Bostons and Blenheims) attacked gun batteries and layed smoke to screen the naval landings. The USAAF, flying one of its first missions over Europe, bombed a German airfield near Abbeville. The best RAF and RCAF squadrons flying the new Spitfire IX were sent to protect the American bombers. Likewise, the Typhoon squadrons, in one of their first combat operations, staged a feint attack in the Ostend area. The majority of the Allied fighter squadrons were deployed as an air umbrella to protect the Allied naval and air forces from Luftwaffe attacks.
Allied intelligence estimated the Luftwaffe had available less than 200 aircraft within range of Dieppe. (After the war we learned the Germans deployed 120 fighters and 100 bombers to counter Jubilee). This meant the RAF would outnumber their enemy by more than 3-1. The RAF air umbrella successfully protected the invasion fleet and the Luftwaffe were not able to cause any significant losses during the raid (The Royal Navy destroyer HMS Berkeley was hit by Luftwaffe bombs on its return voyage to England and subsequently scuttled.)
The RAF and RCAF flew some 2,955 sorties on 19 August in support of Operation Jubilee. Their losses were heavy (106 aircraft, 62 killed in action, 29 wounded, and 17 taken prisoner). But they were satisfied with their achievements. In addition to protecting the fleet, pilots claimed 96 Luftwaffe aircraft destroyed, 39 probably destroyed, and an additional 135 damaged. These losses were considered acceptable given the damage caused to the Luftwaffe. After the war, it was discovered actual German losses were about half those claimed – 48 aircraft destroyed (28 bombers and 20 fighters) and 24 damaged. Only 13 German aircrew were killed and seven wounded. The Luftwaffe took an immediate hit to their operational readiness following the raid but were back up to full strength in a few days.
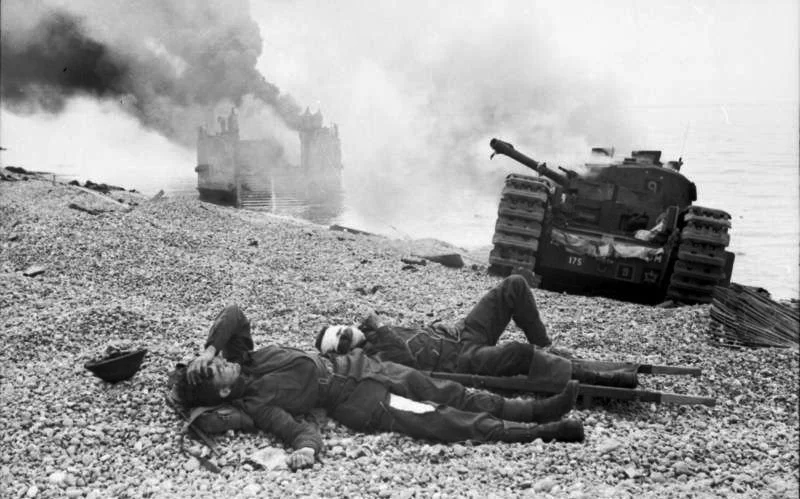
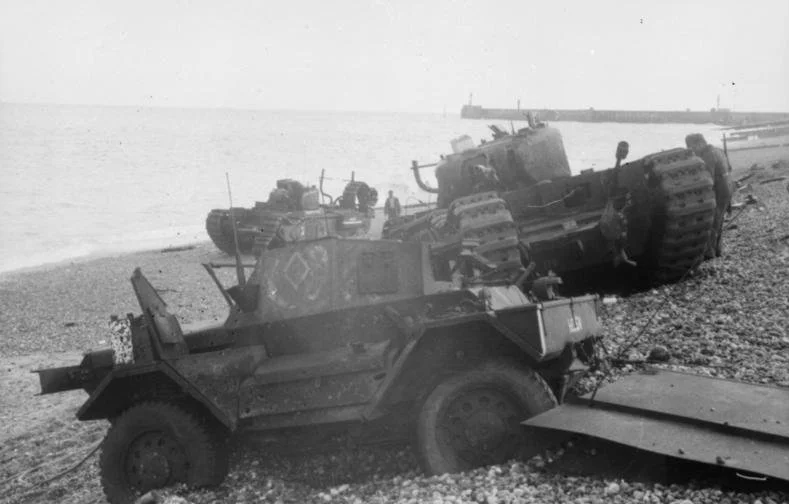
“Attackers grossly under-estimated the strength of the German Garrison... It was a disaster”
A dynamic timeline powers the web map and forwards the animations. The timeline allows users to understand when events were taking place. Each event is broken down into a chapter, with most chapters covering a 15 minute span of the battle. The bottom of the timeline is colour coded to show the main phases of the operations:
Naval Task Force
Amphibious Assault
Holding the Beach
Withdrawal
Surrender
To advance the timeline and watch the animations press on the arrows on either side of the timeline. Users can also click on individual event chapters, or drag the bottom timeline to a section of the timeline you wish to view.
Located on the left side of the timeline are a series of buttons that allow users to expand or contract the timeline, and a button to reset the timeline to the beginning.
The legend is located on the left hand side of the map as a collapsible menu. It contains information on the map symbols for all the unit markers. Each allied unit has a coloured circle that corresponds to the unit and beach it lands at. Gold circles are used to denote the Churchill tanks and Daimler scout cars when landed on the beach.
Out to sea the circles are used to denote groups of ships, individual landing ships and individual assault craft.
Located in the legend are nine viewpoint buttons that can be clicked to move the map around. These viewpoints will quickly move you from various per-determined vantage points to witness the actions taking place.
On the far top right of the web map there are navigation buttons to increase the zoom, and re orientate the map to north.
Alternatively a user can navigate the map using their mouse:
Hold left mouse button to pan
Hold right mouse button to change pitch and bearing
Mouse scroll wheel to zoom.
1942 town plan of Dieppe used to compare modern OSM building footprints to what the town looked liked during the raid.
The first part to mapping Dieppe began with collecting as many original maps of Dieppe in 1942 as possible. Town Plans, topographic maps from the Geographical Section General Staff (GSGS), Defensive Overprints, and contemporary maps from C.P. Stacey.
Each of these maps were then georeferenced in ArcGIS to provide an accurate coordinate system for mapping. Using the buildings from Open Street Map (OSM) data we then compared the contemporary vector with the 1942 raster maps. Using OSM buildings from 2022 as a base, we were then able to delete buildings from new areas of development, and add in buildings that were destroyed over time such as the famous Casino on the Promenade. The intent was not to get a perfect 100% exact town replica, but to have the shape of the town of Dieppe and for the surrounding areas to be similar to how it was in 1942.
1942 Defensive overprint of Dieppe near les 4 vents fortification west of Dieppe being compared to modern satellite imagery.
Four different defensive overprints were georeferenced to provide a good base to map the defensive positions of Dieppe and surrounding areas. This allowed our team to compare multiple versions and accurately map out the defensive situation on Dieppe. Things that were mapped include:
bunkers
machine posts
gun batteries
obstacles (trenches, barbed wire)
radar stations
What are defensive overprints? Defensive overprints are topographical maps that contain enemy defensive positions. This information is generally generated from aerial reconnaissance flights. Photo reconnaissance planes will typically fly directly over top of an objective taking a series of overlapping photographs. With enough overlap, images can be viewed with a stereoscope creating a perception of 3d depth, allowing enemy positions and structures to be mapped out.
The web map is meant to be used as a visual guide to the battle. Plenty of detail is still missing, as it is impossible to map every aspect. Many units are not represented on the web map such as the sappers and gunners of the engineer and artillery units respectively. This is for several reasons: first the goal is to keep the web map simple enough to run on the average computer and internet connection, but complex enough to showcase the entire battle. Second, many of these units were smaller detachments attached to the main force, and are much harder to represent at the scale we are showing other units. Third, the battle was chaos. While the web map shows units as cohesive units, this is merely a representation. Units, commanders, officers, sergeants and soldiers a like were scattered across their respective beaches fighting for their lives. Few units were able to fight as a whole during the battle.
Finally, this web map should be reviewed through the lens of its sources which can be seen in the methodology section below. Much of the timeline and narrative has created using reports on the battle from the Canadian Army’s Second World War historian Colonel C.P. Stacey . Since the original reports created by C.P. Stacey much has been written about Dieppe. Therefore there will be elements missing from this project. Because of this the project will remain open to be refined over time. If you wish to submit an error or omission that you see with the project you can file a report below.
Naval Staff History - Raid on Dieppe (Naval Operations - Historical Section Admiralty
Operation Jubilee - Information from German War Diaries - C.P. Stacey
Operation Jubilee - Part I: The Preliminaries of the Operation - C.P. Stacey
Operation Jubilee - Part II: The Execution of the Operation - Section 1 : General Outline and Flank Attacks - C.P. Stacey
Operation Jubilee - Part II: The Execution of the Operation - Section 2 : The Attack on the Main Beaches - C.P. Stacey
Operation Jubilee - Part III: The Execution of the Operation - Some Special Aspects - C.P. Stacey
Dieppe Through the Lens - Henry/Pallud
The Dieppe web map is an open project that we will continue to refine with help from the community. We know that there are many people who have spent considerable amount of time researching specific parts of the battle. We are open to any submissions, but reserve the right to decide which elements do or do not make it into the project. If you wish to contribute, make a suggestion or provide a resource please use our report form below:
Have you found a bug that needs to be reported? Is there an error or omission that you think we should amend? Use our Google Form to make a report and we will look into all issues.
You can have your very own copy of a Defensive Overprint map used in the planning of Operation Jubilee!
These maps are topographical maps with defensive positions collected from aerial reconnaissance. The map shows machine gun positions, bunkers, barbed wire emplacements, anti-aircraft positions, gun batteries and more.
Each map is printed on high quality paper ready for mounting in a frame for your office or living room.
The best part of buying a map? 100% of proceeds are directed back to the project allowing us to continue to map out the Second World War.
You can help us tell the story of Canadian soldiers by donating today!
Our team is dedicated to keeping the story of Canada in the Second World War at the forefront using interactive technology that makes history open and accessible.
With your donation you help us to keep mapping and digitizing war diaries so we can continue to tell the story of those who served and those who fell.
Do you want to become part of the team? Consider joining Patreon!
As a member of Patreon you can influence our project, what we are working on, and can even direct message our team. As a Patreon you can even get discounts to our entire store!
With your membership you can show your commitment to the project by helping us every month. And the best part is, every Patreon dollar goes directly to the web map!